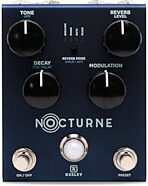
Keeley Nocturne Reverb Pedal


zZounds Gear Experts Say...
Explore the spectrum of reverb, from sunny California springs to the deep, dark echoes of night on the Keeley Nocturne, a reverb developed with Andy Timmons.
Overview
Keeley Electronics and guitar legend Andy Timmons have teamed up to launch Nocturne, a flagship reverb pedal that redefines ambient tones. With three reverb soundscapes shaped by just four intuitive controls, it's designed for effortless onstage control and sonic depth for plug & play types. Advanced users will appreciate its remote switching, expression pedal support, preset storage, and full MIDI integration for maximum flexibility.
Controls:
- Tone - Controls the tone of the reverb. CCW for darker reverb trail, CW for brighter reverb trail
- Level - Controls the output level of the reverb.
- Decay - Controls the length of the reverb trail. CCW for less decay, CW for more decay.
- Modulation - Controls the amount of modulation in the reverb trail.
- Mode Switch - This switch toggles between reverb modes: Nocturne, Spring, Plate
- Left Switch - This switch turns the effect on and off.
- Right Switch - This switch turns the preset on and off. When the preset is active the LED will change from BLUE to RED. Changing any parameter from the preset value will cause the LED to blink. The LED will stop blinking when the parameter is changed back to its preset value. To save the current settings, press and hold the Right Switch until the bypass LED blinks.
Secondary Functions:
- High Pass Filter - Press and hold the Mode Switch while adjusting the Tone to change the low end response of the reverb.
- Pre-delay Time - Press and hold the Mode Switch while adjusting the… read more Decay to change the pre-delay length. 0 to 250ms.
- True Bypass/Buffered Bypass - Press and hold the Left Switch until the bypass LED blinks to switch between Buffered-Bypass (LED blinks three times) or True-Bypass (LED blinks twice). The default is Buffered-Bypass.
- Save Preset - With the effect on and the preset active, press and hold the Right Switch until the bypass LED blinks to save all of the current parameters.
- EXP/MIDI Reverb Mode Switch - Toggle through the reverb modes using a momentary switch with a mono TS cable connected to the EXP/MIDI jack. (The
- EXP/MIDI jack has to be set to Expression mode). The reverb modes can also be toggled by pressing both Left and Right Switches at the same time.
Power Up Functions:
- Factory Reset - Press and hold the Left and Right foot-switches and the Mode Switch while applying power to the unit. The mode and bypass LEDs will blink several times to indicate the reset was successful.
- Wet+Dry/Wet Only - Press and hold the Left foot-switch and Mode Switch while applying power to the unit. The bypass LED will blink BLUE twice for wet+dry and three times for wet only. The default is wet+dry.
- Left Wet/Right Dry - The unit can be set up to where the left output is just the wet signal while the right output is just the dry signal. Press and hold the Right foot-switch while applying power to the unit to activate or disable this feature. The bypass LED will blink BLUE two times for off and three times for on. The default is off.
- Trails - Press and hold the Left and Right foot-switches while applying power to the unit. The bypass LED will blink BLUE twice if trails is on and three times if trails is off. The default is with trails on.
- Momentary/Latching Remote Switching - Press and hold the Left foot-switch while applying power to the unit. The bypass LED will blink BLUE twice for momentary and three times for latching. The default is momentary.
- EXP/MIDI - Press and hold the Right foot-switch and the Mode Switch while applying power to the unit to change between expression or MIDI control on the EXP/MIDI jack. The bypass LED will blink BLUE twice for expression and three times for MIDI. The default is expression.
- MIDI Channel - Press and hold the Mode Switch while applying power to the unit to change the MIDI channel. The bypass LED will blink RED indicating MIDI channel mode is active. The mode LEDs will blink the current channel in binary:
Press the Mode Switch to toggle through the channels. Pressing either the Left or Right foot-switch will exit the MIDI Channel select mode. The bypass and mode LEDs will stop blinking and the selected MIDI channel will be saved. The unit is set default to MIDI channel 1.
Nocturne PC Messages
The unit can be controlled via MIDI through the EXP/MIDI jack with TRS MIDI type A. When in MIDI mode, 23 additional preset banks are available. Each bank allows for a preset per reverb mode for a total of 72 presets. The unit is set default to preset bank 0, but will power up to the last preset bank selected.
To select a preset via MIDI simply send the corresponding PC message 0 - 71
( or 1 - 72 if the controller starts with 1 instead of 0 ).
- Expression Pedal Setup:
Use a TRS expression pedal to control the knobs of the Nocturne.
-Configure the EXP/MIDI jack for expression mode.
-Connect an expression pedal to the EXP/MIDI jack of the Nocturne using a TRS cable.
-Press and hold the Mode Switch until the reverb mode LED blinks.
-Set the expression pedal to the HEEL position. The bypass LED will turn RED.
-Set the knob(s) to be controlled to the desired settings for the HEEL position of the expression pedal. The Status LED will blink if a change has been made.
-Set the expression pedal to the TOE position. The bypass LED will turn BLUE.
-Set the knob(s) to be controlled to the desired settings for the TOE position of the expression pedal. The Status LED will blink if a change has been made.
-To clear all expression settings press and hold either foot-switch until the bypass LED blinks. -Press either foot-switch to exit and store the expression pedal settings. If the PRESET was on when these changes were made then the settings will be stored to the current preset only. The bypass LED will blink to indicate the preset has been updated. If the PRESET was off when these changes were made then the settings will be "global".
-Press and hold the Mode Switch until the reverb mode LED stops blinking to exit without saving.
- Level - Controls the output level of the reverb.
- Decay - Controls the length of the reverb trail. CCW for less decay, CW for more decay.
- Modulation - Controls the amount of modulation in the reverb trail.
- Mode Switch - This switch toggles between reverb modes: Nocturne, Spring, Plate
- Left Switch - This switch turns the effect on and off.
- Right Switch - This switch turns the preset on and off. When the preset is active the LED will change from BLUE to RED. Changing any parameter from the preset value will cause the LED to blink. The LED will stop blinking when the parameter is changed back to its preset value. To save the current settings, press and hold the Right Switch until the bypass LED blinks.
read less
Controls:
- Tone - Controls the tone of the reverb. CCW for darker reverb trail, CW for brighter reverb trail
- Level - Controls the output level of the reverb.
- Decay - Controls the length of the reverb trail. CCW for less decay, CW for more decay.
- Modulation - Controls the amount of modulation in the reverb trail.
- Mode Switch - This switch toggles between reverb modes: Nocturne, Spring, Plate
- Left Switch - This switch turns the effect on and off.
- Right Switch - This switch turns the preset on and off. When the preset is active the LED will change from BLUE to RED. Changing any parameter from the preset value will cause the LED to blink. The LED will stop blinking when the parameter is changed back to its preset value. To save the current settings, press and hold the Right Switch until the bypass LED blinks.
Secondary Functions:
- High Pass Filter - Press and hold the Mode Switch while adjusting the Tone to change the low end response of the reverb.
- Pre-delay Time - Press and hold the Mode Switch while adjusting the… read more Decay to change the pre-delay length. 0 to 250ms.
- True Bypass/Buffered Bypass - Press and hold the Left Switch until the bypass LED blinks to switch between Buffered-Bypass (LED blinks three times) or True-Bypass (LED blinks twice). The default is Buffered-Bypass.
- Save Preset - With the effect on and the preset active, press and hold the Right Switch until the bypass LED blinks to save all of the current parameters.
- EXP/MIDI Reverb Mode Switch - Toggle through the reverb modes using a momentary switch with a mono TS cable connected to the EXP/MIDI jack. (The
- EXP/MIDI jack has to be set to Expression mode). The reverb modes can also be toggled by pressing both Left and Right Switches at the same time.
Power Up Functions:
- Factory Reset - Press and hold the Left and Right foot-switches and the Mode Switch while applying power to the unit. The mode and bypass LEDs will blink several times to indicate the reset was successful.
- Wet+Dry/Wet Only - Press and hold the Left foot-switch and Mode Switch while applying power to the unit. The bypass LED will blink BLUE twice for wet+dry and three times for wet only. The default is wet+dry.
- Left Wet/Right Dry - The unit can be set up to where the left output is just the wet signal while the right output is just the dry signal. Press and hold the Right foot-switch while applying power to the unit to activate or disable this feature. The bypass LED will blink BLUE two times for off and three times for on. The default is off.
- Trails - Press and hold the Left and Right foot-switches while applying power to the unit. The bypass LED will blink BLUE twice if trails is on and three times if trails is off. The default is with trails on.
- Momentary/Latching Remote Switching - Press and hold the Left foot-switch while applying power to the unit. The bypass LED will blink BLUE twice for momentary and three times for latching. The default is momentary.
- EXP/MIDI - Press and hold the Right foot-switch and the Mode Switch while applying power to the unit to change between expression or MIDI control on the EXP/MIDI jack. The bypass LED will blink BLUE twice for expression and three times for MIDI. The default is expression.
- MIDI Channel - Press and hold the Mode Switch while applying power to the unit to change the MIDI channel. The bypass LED will blink RED indicating MIDI channel mode is active. The mode LEDs will blink the current channel in binary:
Press the Mode Switch to toggle through the channels. Pressing either the Left or Right foot-switch will exit the MIDI Channel select mode. The bypass and mode LEDs will stop blinking and the selected MIDI channel will be saved. The unit is set default to MIDI channel 1.
Nocturne PC Messages
The unit can be controlled via MIDI through the EXP/MIDI jack with TRS MIDI type A. When in MIDI mode, 23 additional preset banks are available. Each bank allows for a preset per reverb mode for a total of 72 presets. The unit is set default to preset bank 0, but will power up to the last preset bank selected.
To select a preset via MIDI simply send the corresponding PC message 0 - 71
( or 1 - 72 if the controller starts with 1 instead of 0 ).
- Expression Pedal Setup:
Use a TRS expression pedal to control the knobs of the Nocturne.
-Configure the EXP/MIDI jack for expression mode.
-Connect an expression pedal to the EXP/MIDI jack of the Nocturne using a TRS cable.
-Press and hold the Mode Switch until the reverb mode LED blinks.
-Set the expression pedal to the HEEL position. The bypass LED will turn RED.
-Set the knob(s) to be controlled to the desired settings for the HEEL position of the expression pedal. The Status LED will blink if a change has been made.
-Set the expression pedal to the TOE position. The bypass LED will turn BLUE.
-Set the knob(s) to be controlled to the desired settings for the TOE position of the expression pedal. The Status LED will blink if a change has been made.
-To clear all expression settings press and hold either foot-switch until the bypass LED blinks. -Press either foot-switch to exit and store the expression pedal settings. If the PRESET was on when these changes were made then the settings will be stored to the current preset only. The bypass LED will blink to indicate the preset has been updated. If the PRESET was off when these changes were made then the settings will be "global".
-Press and hold the Mode Switch until the reverb mode LED stops blinking to exit without saving.
Features:
- Tone - Controls the tone of the reverb. CCW for darker reverb trail, CW for brighter reverb trail- Level - Controls the output level of the reverb.
- Decay - Controls the length of the reverb trail. CCW for less decay, CW for more decay.
- Modulation - Controls the amount of modulation in the reverb trail.
- Mode Switch - This switch toggles between reverb modes: Nocturne, Spring, Plate
- Left Switch - This switch turns the effect on and off.
- Right Switch - This switch turns the preset on and off. When the preset is active the LED will change from BLUE to RED. Changing any parameter from the preset value will cause the LED to blink. The LED will stop blinking when the parameter is changed back to its preset value. To save the current settings, press and hold the Right Switch until the bypass LED blinks.
WARNING: Cancer and Reproductive Harm - www.p65Warnings.ca.gov.
Specs
Dimensions and Weight in Packaging
Base Item
- Shipping Weight: 1.22 lbs
- Shipping Dimensions: 6 x 5 x 3 in
- Manufacturer Part Number (MPN): KNocturne
Documents and Manuals
For support or warranty questions, please contact the manufacturer:
Phone: 405-341-2025
Web: https://robertkeeley.com/contact
Phone: 405-341-2025
Web: https://robertkeeley.com/contact
New
$269.00
you're approved! No credit check!
- No interest and no late fees
- No paperwork
- No social security number required
- No questions about your income
Just provide your credit or debit card number in checkout as usual, and we’ll ship your order before the end of the business day.
FREE
-Day
Shipping!
Get it
for
Get it
(or get it
with an order of
),
if you order within
Shipping to
This is a carousel with product cards. Use the previous and next buttons to navigate.
Related Accessories
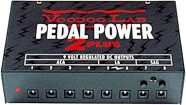
Voodoo Lab Pedal Power 2 Plus Universal Power Supply
$199.99
- No Credit Check6 payments of$33.33/mo
-


This is a carousel with product cards. Use the previous and next buttons to navigate.
Related Accessories
-
Voodoo Lab Pedal Power 2 Plus Universal Power Supply
$199.99
- No Credit Check6 payments of$33.33/mo
-
-
-
This is a carousel with product cards. Use the previous and next buttons to navigate.
People who bought this item also bought

Keeley Halo Andy Timmons Dual Echo Pedal
$299.00
- 8 payments of$37.38/mo
- No Credit Check6 payments of$49.83/mo
-

Walrus Audio Qi Etherealizer Pedal
$449.99
- 8 payments of$56.25/mo
- No Credit Check6 payments of$75.00/mo
-
Universal Audio Dream '65 Stereo Amplifier and Cabinet Simulation Pedal
$399.00
- 8 payments of$49.88/mo
- No Credit Check6 payments of$66.50/mo
-
Walrus Audio Xero Polylooper Pedal
$299.99
- 8 payments of$37.50/mo
- No Credit Check6 payments of$50.00/mo
-